Keep natural skin texture in a headshot edit
Better light shouldn't come with a new face. Ask an editor for a professional headshot and it may hand back skin that's either airbrushed smooth or sharper than your camera ever saw.
What you'll make
an edited headshot whose skin detail matches the original, or a specific note about what changed and one repair request.
What you'll need
a clear, recent photo of yourself, or of someone who has agreed, that your organisation lets you use in an image editor. ChatGPT and Gemini both edit an uploaded photo. You’ll compare the original and the edit side by side, so keep both at full size. Allow about 15 minutes.
Example result.
Forehead: same lines in the same places
Under the eyes: lines and shadow still there, a little softer with the new light
Cheeks: same texture; no new even, dotted pattern
Mouth and beard: same shape and stubble
Decision: use it
1. Ask for the light, not a makeover
Start with the actual problem: harsh side light, a busy background, an awkward crop. If the photo already works, an ordinary crop may be all it needs. Then make skin detail something to keep, not something to improve:
Edit my attached photo for softer, more even headshot light and a
[background]. Keep the facial proportions, expression, age, visible
skin detail, hair and clothing as in the original. Don't smooth the
skin, remove lines or add extra pores or sharpness the photo doesn't
show. Keep the pose and crop. Make one candidate.
[background] is what you want behind the person, such as “plain mid-grey”.
“Make me look professional” invites a broad makeover. And a blurry photo can’t supply fine skin detail just because the result is high resolution: the editor will invent texture to fill it, which isn’t the person’s skin. If the eyes or features aren’t clear, take a better photo first; the remote headshot session guide helps.
Why this works: “no smoothing” alone can push an editor the other way, into over-sharpening. Asking it to keep what the photo shows, and add nothing, covers both.
What you should see: one candidate with the new light and background and skin that looks like the original’s.
2. Compare one region at a time
Open both files at the same face size. Check one region at a time, and write down what you see in plain words:
- Forehead: are the lines in the same places?
- Under the eyes: are the lines and shadow still there?
- Cheeks: is the texture the same, or has a new, even, dotted pattern appeared?
- Mouth and beard: same shape, same stubble?
Useful notes are specific: “the under-eye line in the original is gone” or “the cheeks have a new uniform dotted texture”. “Looks AI” tells the editor nothing it can fix. Light can soften or reveal a line without changing it, so look at the whole face too.
Why this works: smoothing and invented sharpness are both easy to miss at full-face view and obvious region by region.
What you should see: a note per region: “same”, or what changed.
3. Decide, and get the person’s say
If every region matches, use it. If one region changed, repair it once. If the face keeps changing, go back to the original and use an ordinary light or crop adjustment instead. For a real portrait, the person in the photo decides whether it still looks like them; the team approval sheet keeps that separate from style choices.
Why this works: a single repair can restore a region. Repeated repairs on an edited face drift further each time.
What you should see: a clear yes, one repair, or a restart.
Check the result
- Forehead and under-eye lines are where they are in the original.
- The cheeks have the same texture: not airbrushed, not newly dotted or crisp.
- The face shape, expression and stubble match.
- The person in the photo agrees it looks like them.
The usual failure: one of two opposite things. Either the skin is smoothed into a beauty filter, or it’s sharpened into a crisp, even texture across the whole face that looks more detailed than the original could show. Both are invented. Spot them by comparing the cheeks and forehead at 100%. Repair the region:
The softer light and background are useful. In [region], the candidate
[what changed]. Use my untouched original as the reference. Correct
only that region, keeping the light, expression and clothes. Don't
compensate with extra sharpness or invented pores. If the original
doesn't show enough detail, say so.
[region] is where, such as “the cheeks and forehead”. [what changed] is your note, such as “has a sharper, more even texture than the original”.
Worked example: a kitchen photo to a studio headshot
Fictional example. A man’s kitchen photo was edited for a plain grey studio background and softer light.
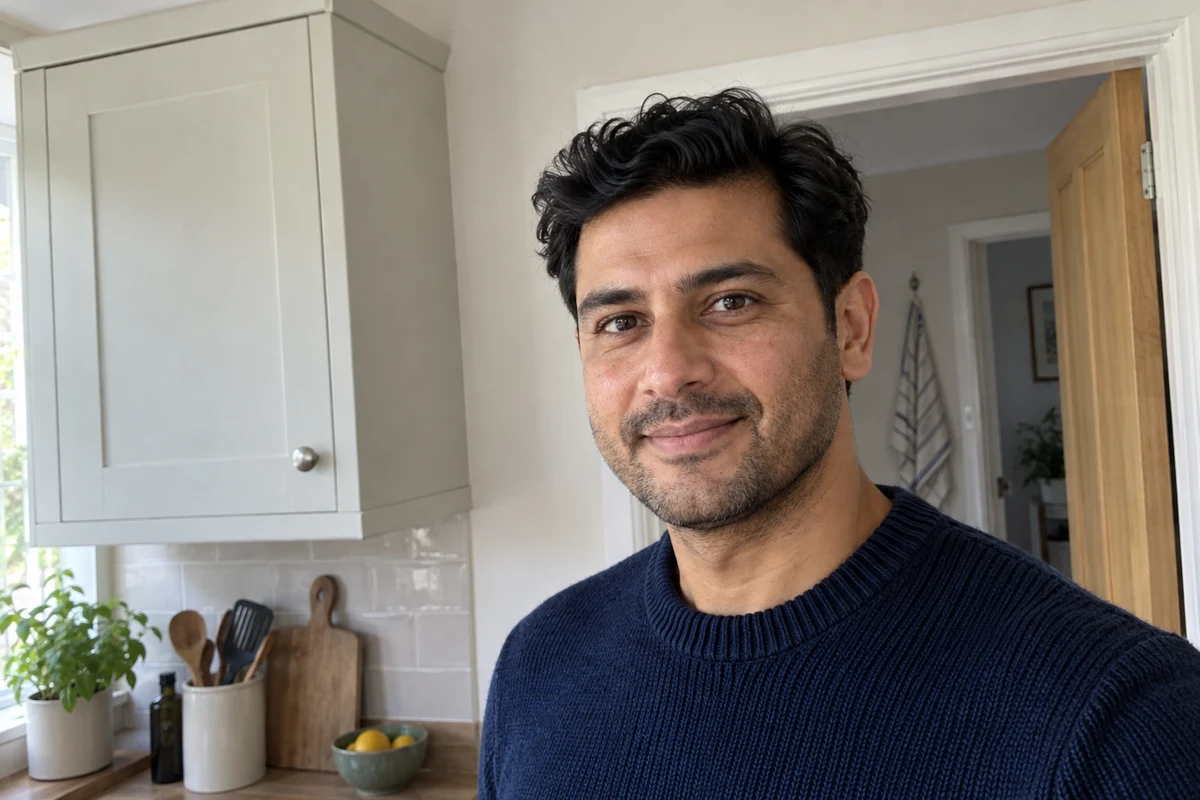
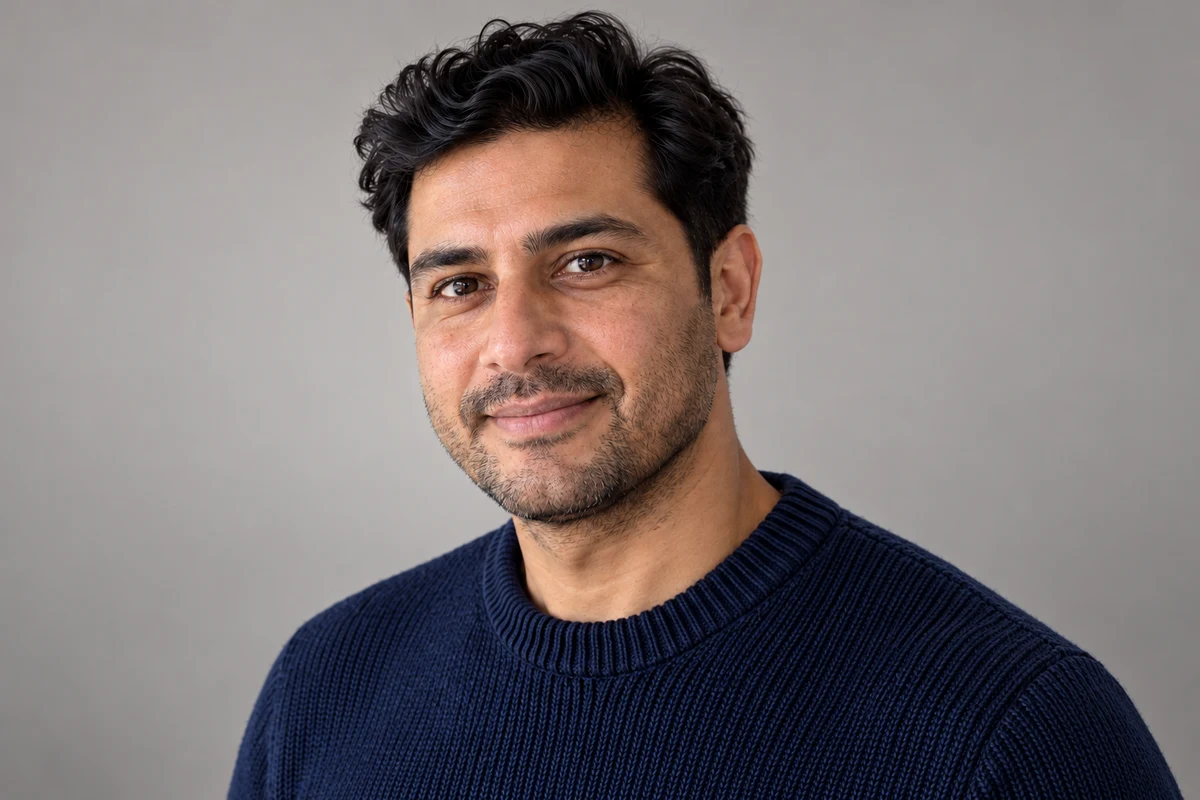
- The background and light worked. The kitchen is gone, the light is even and the knit, stubble and expression all match.
- The texture didn’t. At full size, the forehead and cheeks have a crisper, more uniform texture than the original, which is softer and less even. Lines are still there, so it isn’t smoothing; it’s the opposite failure, detail the original photo didn’t contain.
- The repair names the region. The next request is the repair prompt with “the cheeks and forehead” and “has a sharper, more even texture than the original”. The new candidate gets the same region-by-region check.
Try it
Compare texture at a matched scale
Reject beautification drift and request a source-led correction.
Sharper isn't more accurate. Compare each region with the original and keep only the detail it shows.
The example in text
- Forehead detail
- Under-eye lines
- Cheek texture
Task kit for this job: Download (ZIP) · Reusable instructions
Go deeper
Keep the review about the edit, not the person
The job is checking what the edit changed. Don’t ask AI to read health, tiredness, ethnicity or age from the photo: a line or shadow is not evidence of any of them. Keep every note about the original and the edit.
Check the export too
Compression and small display sizes change how texture looks. Check the chosen file at full size, then the exported version where it will appear. Don’t regenerate the face to fix a resizing problem; the LinkedIn export guide covers checking the file itself.
Check age-related features separately
Lines, grey hair and jawline carry a person’s age as well as their texture. The age drift guide covers those checks.